


Skillset: Guides on How to Make Shoes (Details)
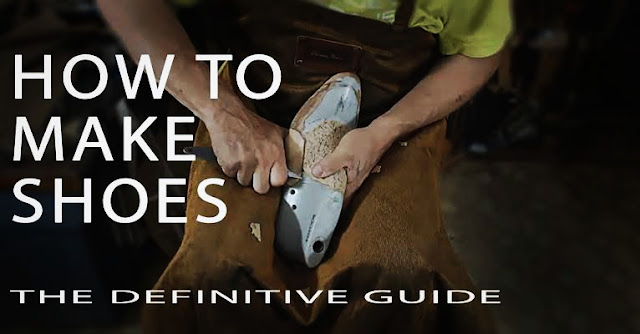

How to make shoes?
If you plan to learn a craft of shoe making and to make your shoes, you must be wondering how shoes are made? Is it difficult to make shoes? Is shoe making for me?
The lack of knowledge and misunderstanding the process leeds to fear and makes you pass on the idea of making your own shoes.
Before you start…
Shoe making is a complicated process, with many steps and details that ,obviously, I won’t be able to show you in this post. What I will do, I will give you the simplified version of how to make shoes.
Other important subjects that I will share in this post are the tools and materials used in shoe making.
There is a common misunderstanding about the shoe making tools, materials and machinery that you need to use to make shoes.
You watched YouTube videos on how to make shoes and you see shoemakers use many different tools, and you think that is what you need to get started making your shoes.
Wrong….
The truth is, for you as a beginner in shoe making, you only need to have minimum set of tools to make your shoes. Only when you will get the experience and skills in this craft you will add those tools to your arsenal.
Let’s begin:
Foot Measurement:
First step in shoe making is always taking your foot measurements.
In bespoke shoe making we take the foot measurements to create a shoe last or customize the shoe lasts.
If you are not making your last, you need these measurements to know what size of a shoe last you need to purchase (same shoe lasts size have different widths).
You can check how to measure your feet correctly in this post : Foot measurement :Order the right lasts
and you are welcome to watch the YouTube tutorial that I made.
Simple Method How to Measure Your Feet Easy & Fast
Customize your shoe Last:
Another good option for you to make shoes is, to take the standard last and customize it according to your feet measurements as many shoemakers do.
Pattern making:
I personally think that pattern making is a core in shoe making because, if you want to learn how to make shoes, not only beautiful but comfortable as well, you need to master pattern making first.
That’s why I focus a lot on the pattern making in all my 19 courses to give to the beginners in shoemaking this super important knowledge to succeed in their shoe making craft.
Cover the last with masking tape:
This is the first step in pattern making, as we will be applying our shoe design on top.
I created a full, step by step guide on how to cover your shoe last with masking tape like a pro.
Apply the design:
When you were thinking about how to make shoes, you had imagined a certain footwear, a certain design, but how do we get it?
For us, to make the pattern of the footwear that we want, we first must draw the design on the shoe last (on masking tape).
I am not talking about pretty drawings, this is a technical drawing on the shoe last according to the rules of the specific footwear construction.
Making the basic pattern:
The basic pattern is the pattern that contains all lines of your shoe design and the lines of the shoe last. You will use this pattern later to develop the upper and lining patterns.
Why basic pattern is so important pattern in shoe making you can learn in this post https://www.shoemakingcoursesonline.com/shoe-pattern/
Tools and materials: cardboard, compass, utility knife
Checking the basic pattern:
You will use this basic pattern to develop the patterns of upper and lining, that is why the basic pattern must be correct.
The best way to check your basic pattern is, to use simple A4 paper. I will not go into details here because I wrote the full article on the subject and you can read it here.
Save your money on leather, make shoes working with paper patterns
Tools and materials: paper A4, nails, cutting board
Upper and Lining pattern making:
The upper and lining patterns are more detailed patterns that include seam allowance and marks.
Tools and materials: cardboard,compasses, utility knife, cutting board
Cutting/Assembling/sewing
Cutting:
We use the upper and lining cardboard patterns in shoe making to cut leather parts (or any other materials).
Tools and materials: leather, silver pen, utility knife, cutting board
Assembling:
Before you will sew the upper and lining together you need to attach all parts of the upper and lining. During this shoe making step you will skive some of the upper and lining parts, and will reinforce specific places of your upper with different reinforcement tapes.
In the making of every shoe type there is a certain order of assembling.
Tools and materials: shoemaking knife, shoemaking hammer, reinforcement tape 4mm and 16 mm
Sewing:
We sew all parts together: upper with lining. At this stage of work we get the complete upper, meaning the top of our shoe.
Tools and materials: sewing machine, shoemaking hammer
Insole making:
Insole is an inner part of the shoe that basically connects top part of the shoe (upper) with bottom part (sole, heel).
There are insoles from cardboard (mostly used in the the mass shoe production) and from vegetable tanned leather (in bespoke shoe making).
In bespoke shoe making shoemakers use the leather insoles because of the welted construction. The leather insoles will allow you to sew the upper to the insoles.
Carre Duker wrote very informative post about making the leather insoles, and I encourage you to read it.
http://carreducker.blogspot.com/search?q=insole
Tools and materials: taxon board, shankboard, shoemaking rasp or a drill dremel, shoe making knife, shoemaking hammer, contact glue
Lasting:
In this shoe making step you will attach the edges of the upper and lining to the insoles.
When you will learn the process of how to make shoes, lasting is a magical milestone, when in the first time you will see your creation comes to life.
The toe puffs and the counters:
During lasting we must attach the toe puffs and counters. These are materials that hold the shape of the foot and protect the foot from damages.
We place them between the upper and lining of the toe area and in the heel area.
Tools and materials: pincers, nails, shoemaking rasp shoe making knife, contact glue, leather for stiffeners or non-woven chemical material
The sole making:
In shoe making you can use different materials for soles. The easiest way is, to use ready-made rubber soles but if you want to learn how to make shoes with natural materials, you always need to use the vegetable tanned leather.
For women shoes we use the vegetable tanned leather with a thickness of 2-3.5 mm, for men shoes 4-5 mm.
Tools and materials: vegetable tanned leather, cork, shoemaking rasp shoe making knife, contact glue
Heel making:
With the heels we also have options. You can use ready-made plastic or wooden heels, with one big but…
You can’t just buy any heel that can matches the height of your shoe last, but more importantly, the heel must match the shape of your last (the bottom).
Meaning, if you think about buying ready-made heels, make sure to purchase them together with the lasts.
Second option and, in my opinion, is the best option, to make your own heels from leather or wood.
So, if you want to learn how to make shoes with leather stacked heels, here is a great post about it.
https://www.shoemakingcoursesonline.com/stacked-heel/
Finishing and sock lining:
At this step of shoe making we clean our soles ( made from leather) and heels using glass. We take off the top layer of leather to remove all marks and scratches left from the shoe making process.
The cleaning of the shoe soles and heels can be a short or long process, depends on the quality you want to reach.
You can continue to clean it with sandpaper, use wax, polish cream and dye color.
In finishing we must include the finishing of the upper as well (polish cream, wax).
Sock lining:
This is the last step of the process of how to make shoes and here we will take off our shoes from the lasts, and place the sock lining inside.
Sock lining is an inner part of the shoes that covers the insole. It can be with padding or without, and can be made from different materials.
That is it. Now, you have made your own shoes.
As I mentioned in the beginning of this post I simplified the shoe making process, cutting out many details and steps on the way, but right now you can understand how to make shoes and decide, if this is the adventure you want to be a part of.
To sum it up everything watch the process in the video Below
(Shoemakingcourse)


Post Comment